Wednesday, February 29, 2012

Time to Shake things up a bit!

Continuing on from our dropshotting technique...I would like to introduce you to two more techniques!  The Flickshake and the Shakey head!  Both techniques can be fished on your dropshot/finesse rod and are awesome techniques to have in your back pocket when the bass go into lock jaw mode and need a finesse presentation to trigger strikes!

The Flickshake

The Flickshake technique utilizes a very crucial technique that most anglers have run into at least once in their lifetime...the wacky worm rig.  The wacky worm rig is one of my go to rigs in the late spring, summer, and fall and works wonders when you are fishing in shallow areas with sparse cover.  The slow decent on a weightless wacky rig is irresistable to a bass, and the flickshake is the same thing only using a jig head instead of a regular hook.  Flickshakes, like other finesse presentations, are meant to be fished slow.  Sudden twitches of the rod will bring the lure off of the bottom quickly and will then make a quick fall.  Pausing periodically and varying the power in your twitches will allow your lure to wiggle at different heights and rates, thus triggering a strike.


The flickshake jig head comes in two common styles, one with and one without a wire weed gaurd.  For simplicity sake, I like having the ones with the weedgaurd already attached so that I can fish in heavier cover areas more effectively.  The lighter the weight jig head the slower the fall, since I am used to fishing lures mostly weightless I tend to go with a lighter flickshake head since I have more confidence in it.  The jig head also helps to elevate the worm slightly off the bottom allowing the bass to inhale the lure more easily.

What type of lures do I use with a flickshake?

Straight worms like a Senko or other uniform type worms work really well with this bait.  One in particular that I really like using is the Jackall Flick Shake worm.  It has a slender profile and has A TON of action when bounced around with the jig head.  Other lures like curl tail worms and other straight worms would work as well


Once you have chosen the bait, you would rig the flickshake like you would a wacky worm rig with the hookpoint going through the center or the "collar" of the worm.  Here is a good video that gives some more detail on the flickshake rig and what it looks like in action!


The Shakey Head

The Shakey Head rig also is a finesse variant of another popular rig, the Texas Rigged Worm.  In this instance the Shakey Head rig allows you to downsize and streamline your presentation without having to worry about pegging bullet weights and having extra terminal tackle.  There is one style available that most companies vary their design off of, and that is a round jig head with a screw lock.  You can see this jig head below...


The screw lock allows you to screw the head of your bait to the head of the jig, which gives you a secure point to prevent the worm from ripping off easily.  All of these jig heads come in different styles, colors, and hook sizes so find what works for you.  In my case I try to use a 3/16 or 1/8 oz jig head with a 2/0 or 3/0 hook.  This will work the best for most lures.

The lure choices are endless with this bait.  Worms with floating tails are the main choice with this jig head...but others may use shad style baits, creature baits, and craw style baits as well.  My favorite to use though is either a straight tail worm like the ZOOM Shakey Head worm, or a smaller curly tail worm like a Gambler 7" Ribbontail worm.  Both of these worms give off great action at the tail end which is essential when fishing this rig.  Both the Shakey Head and Flickshake require you to make the most action possible with the smallest bit of movement.  That's what makes a finesse rig so effective...slow moving, high action!


Here are some good videos showing you how the shake head is rigged and how it looks underwater.  After spinning and locking the head of the worm to the jig head, you will texas rig the bait like you would on a regular worm hook.  A good thing to learn how to do is skin hooking the worm after you penetrate the hookpoint all the way through.  This will allow you to fish it virtually weedless without getting hung up.  Another good point to bring up is toning down your hookset.  You don't have to swing for the fences when setting the hook on a finesse technique.  A good pop of the wrist along with a sharp hook will be plenty to penetrate through a fishes mouth.  Otherwise you run the risk of pulling the bait out of the fish's mouth or breaking your smaller pound test line.


So when and where do I fish this rig?

Any time you would use a finesse rig would warrant using these baits.  Cold fronts, hot summer days, during spawning time,  and when water temperatures are dipping down into the 50's or less.  When the bass are less active and other presentations aren't working, these will be your ace in the hole to start triggering bites.  But keep in mind that these rigs need to be fished slowly with a lot of rod tip action!  You are not encouraging a reaction strike in most instances so you want to entice the bass into biting.  Take the time to learn this craft, and you will be catching fish when others don't.  Shallow areas, flats, boat docks, and areas with some form of vegetation or brush will all be places to be looking for when throwing these baits.

That pretty much sums up what I have experienced, and I plan on using these finesse techniques at my first tournament this season.  I look forward to hearing from all of you too to see how these techniques help you throughout the season!

Tight Lines,

Fluke

Monday, February 27, 2012

Dropshotting for Suspended Bass

Dropshotting has just recently been thrown into the mix of new techniques that will hopefully add to my overall success this year.  This technique has been around for awhile and most pros use this technique when bass are suspending off the bottom in deeper water areas.  Otherwise known as the "split shot" rig, this technique is one of the most successful finesse rigs that a bass angler should have in their arsenal.

What you need to have to be successful with this rig...

- 6'6" to 7'2" Spinning Rod with a Medium Lite or Medium power and a Fast or Extra Fast action tip
*You can also use a baitcasting rod with the same characteristics, but you want to be able to throw lighter line with this rig since it is a finesse technique*
- Spinning Reel with 6-10 lb flourocarbon
*Flourocarbon will give you more feedback to the bite and cover you are in, and will not be visible to the fish*
- Cannonball weight (1/8 to 3/8 oz)
*I like to keep it in the middle so a 1/4 oz cannonball weight will work in most applications, you may want to go up in weight if the area you are fishing is really deep*
- 1/0 EWG Worm hook
*You can use a smaller or bigger hook, but for most of the plastics I will throw a 1/0 hook will work for most baits*

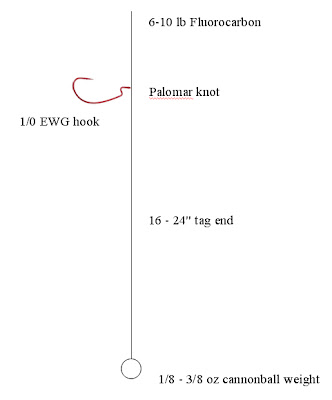
After you have all of the necessary pieces, the success of this technique stems from the way you rig it.  In order to fish this rig effectively you must have the hook point facing upward, the hook should be parallel with your line (not perpendicular), and the tag end should be long enough to suspend at a decent height off of the bottom.


As you can see in the image, this is what the final rig should look like when you are finished.  To begin tying this rig, should have a firm understanding on how to tie the Palomar Knot (see below) 

In image number two you should have a tag end atleast 16-24 inches long.  It will look goofy at first but the tag end will be long enough to give the bait a good height off from the bottom.  Most people that try tying a dropshotting rig miss a very important step at the end after they finish tying the Palomar knot, and that is bringing the tag end back through the eye of the hook on the hookpoint side.  This will ensure that the hook stands proud of the line when the rig is being fished. This can be seen at the 1:08 mark in the following video.


After tying the hook to the line the last step is attaching the cannonball weight or drop shot weight.  It is important that the angler DOES NOT tie the weight to the line!  By not tying the weight to the line you will only risk losing the weight if a snag occurs instead of losing the hook, bait, and weight.  Most dropshot weights come with a crimped wire attachment that allows you to pinch the line to the weight without having to physically tie it on (See picture below)


Now your rig should be completely finished and should like the first picture in this write-up.

What kind of baits should I use?

Again, this is a finesse technique so smaller worms, tubes, shad style baits, curly tail grubs, and senko type baits can be used.  I generally prefer to use either a 4-5 inch straight tail Roboworm or a Zoom Finesse worm.  Play around with what you are comfortable with, you'll eventually find a technique or pattern that will work for you!


The bait should either be texas rigged, or nose hooked so the bait can float horizontal with the lake bottom.

How do I fish this rig?

The dropshot rig should be fished with close to zero slack in the line with the weight at the bottom of the area you are fishing.  This will help you keep the bait in the strike zone and allow you to feel the cover you are dragging the weight through.  By bouncing the rod tip, you will dictate the overall action of the bait.  Pauses should be made in between to increase your time in the strike zone.  Even lifting it off the bottom and letting it fall will trigger a strike.  Seems like most of my strikes have a occurred on the fall of this bait.  You can see this happening in the video below...


This rig can be fished throughout the year whenever a finesse situation would be more appealing to the fish.  I have used this in cold fronts as well as hot summer days with great results.  Deep water structure as well as less weedy shallow structure are all prime targets for this type of finesse technique.  Some pros also prefer fishing this bait in clearer water as opposed to stained water since this technique relies on the fish seeing the lure in action off the bottom. The only place I would not use this technique is when I am shore fishing.  Shore fishing with this bait puts you at a disadvantage because the steeper the angle you put between the lure and your pole, the closer that bait will end up hugging the bottom...especially in shallow water areas.  You want to only be casting the bait at the most 20-30 feet away from you so that you can keep that bait in a vertical position during the retrieve.

That pretty much sums up the dropshot rig.  There are other variants you can try with this bait such as using two hooks instead of one, using different styles of weights or using split shot weights, and using different size lures and hooks...but all of these varieties stem off of the same basic rig.  So once you learn this, you can do it all.

MORE TO COME...

Flickshakes and Shakey heads...some more finesse techniques to add to your arsenal that you can do on the same rod and reel as you dropshot rig!


Tight Lines to all of you...the tournament season will be starting in 2 1/2 weeks!

Fluke

Wednesday, February 15, 2012

Misconceptions of Technique Specific Gear

I took some time writing this up as a comment on another blog after a heated debate ensued on whether technique specific gear is really necessary for the average fisherman. This was my response, and I really want all my readers to understand that my own decision making on rods and reels are based off of my own personal experience and the combined knowledge of others that have put their time in on the water. By no means does that mean that you to have to follow my lead or that I am right...I am just giving some essential information that I feel will steer you in the right direction to help you make the best possible gear choices that works for you in the end. So always keep that in mind as we move forward through this coming season and realize that sometimes a little goes a long way...

"You are right, the gear does not make the fisherman at all...and I think that's what most average anglers don't come to grips with. I fished with one to two rods for many years and I could out fish a good percentage of them out there, and that was because I was familiar and confident with my equipment from putting so much time on the water. Now that I have branched out I have started to understand the added benefit some extra setups can buy me in an average fishing situation or a tournament situation. Doesn't matter what action, length, or power the rod is. All that matters is knowing that once I throw that lure out there, I will have the best chance to present that lure, detect a strike, and bring the fish back to me without incident. Any time I go out fishing, I want to put myself in the best situation possible to catch as many fish as I can...that's the best way to learn! No one learns by going out to a lake and getting skunked...you learn by catching and putting 2 and 2 together...and only then can you make an informed decision if a different setup is truly warranted. I am no KVD or Denny Brauer...but I know that if I was fishing and the bass were hitting lipless cranks or any other lure for that matter...that I would know the right rod/reel/line setup to get my limit or outfish my buddies. Yeah it saves time and effort retying and blah blah blah if I have more combos...but the bottom line is knowing your equipment well enough to make the necessary adjustments if need be to ultimately make your experience on the water better."

Just some things to think about this year...

Tight Lines,

Fluke

Monday, February 13, 2012

Flip and Pitch or Bust!

A new post popped up in the DuPageAngler.com forum a few days ago, and really got me thinking about the goals that I had in mind for myself for this 2012 fishing season.  I haven't really given it much thought, but I realized that I had zero experience and confidence with flipping and pitching jigs and weighted texas rigged plastics!  I have had this technique on the back burner for the last few years because I really had no clue how to fish it properly.  So for my own benefit and those who are starting to learn just as I am, here are some good tips online that I found to get you started in the right direction.  As a follow up, I will be posting again once I catch a few fish on my new equipment to give you some feedback on what to look for when flipping and pitching.

The first thing that I really had to focus on was the gear I was going to use.  I had never bought a flipping rod before so it really took some time to narrow down my choices.  Everything that I have read pointed me in the same direction....longer rod, heavier power, and fast action.  My sweet spot rod is usually a 7 footer so I knew that my flipping rod would have to be longer than that to give me both a leverage advantage and a distance advantage when flipping and pitching.  The Shimano rod line this season offered me a few different routes as far as flipping rods go...but since I was on a budget I chose to get the 7' 7" MH Extra Fast action Shimano Compre.  The rod is less than 8' which makes it still legal to use in tournaments, and is longer than my other rods which will make it easier to pitch farther distances.  The MH power was the perfect amount of backbone for heavy cover, and the extra fast action will give me faster and stronger hooksets in heavy cover.  This will be my rod of choice for now, but as I progress throughout the season I may change the rod out for a different length and tip action to pinpoint what works best for me...but for now the Shimano Compre should do the trick.

Shimano Compre Flipping rod (7' 7" MH Extra Fast)

This rod will be paired up with a Quantum Accurist PT baitcasting reel (7.1 gear ratio).  Ideally the reel should at least have a 7.0 gear ratio to get fish out of cover quickly when pitching or flipping jigs and larger plastics.  It also comes with a flipping switch, which is ideal since it allows you to not have to turn the handle to re-engage the spool after the cast which could cause you to jerk the bait and spook a fish.  The last thing that I really liked about this particular reel was that it only had a set of centrifugal brakes.  Centrifugal brakes create less braking force when the spool is spinning slowly which makes it ideal for pitching and flipping.  Magnetic brakes on the other hand apply more brake force when the spool is turning slowly...which is not ideal for flipping and pitching since it will slow down the bait before it reaches it's target.

Quantum Accurist PT (7.1 gear ratio)

Now that I had a rod and reel, what line should I use?  Since I will be fishing in heavier cover I probably want a durable line that won't break easily.  I will also want something with close to zero stretch for sensitivity...and depending on how the fish are reacting I may want a fast or slow fall rate.  So for this case I will either use a heavier braid (Power Pro) around 50 to 65 lb test, or I will use a heavier fluorocarbon (Seagaur InvizX) in the 17 to 20 lb range.  Since I am most comfortable with braid, that will be my line of choice.  No fluorocarbon leader will be used either.

So now that I have all of my gear chosen how do I use it?  This I really had no answers to until I met the flipping and pitching legend himself, Denny Brauer.  He was holding a clinic at Bedford Sales in Morris, IL and was showing the crowd the proper techniques for flipping and pitching.  Unfortunately it was my first time seeing someone actually doing it in person so I could not begin how to describe it...but fortunately good ol' Denny made a video on youtube about it...and here it is...


And here is another great video in further detail on how to flip and pitch...there is a lot of good tips in these videos so be prepared to soak it all in!


After gaining an understanding of how to cast with my equipment I started to learn more about the lures I would be using.  Most of the areas that I will be fishing are inhabited with crayfish, bluegill, and smaller shad.  So I want my lures to mimic those colors of forage.  Green, blue, black, purple, brown, red, orange, gold, and silver are just a few to mention.

Most of my jigs are 3/8 oz or 1/2 oz football style jig heads or arch style heads.  Some of the ones that I purchased are made by BOOYAH and Flat Top Finesse Jigs that I found at Bass Pro...see below...


Another great set of jigs that I found came from a website called CaliforniaReservoirLures.com.  These jigs are second to none with Mustad hooks and rubber and silicone skirts.  I was really impressed with the craftsmanship on these baits and plan on buying more from them in the future!


Besides jigs, I will also be using large plastic creature baits like the Berkley Havoc Pit Boss and Devil Spear. There are many variants of those two that I mentioned, so find what color and brand works the best for you. Also it is a good idea to put a smaller craw shaped plastic on the hook end of your jigs to add to the natural fall and action of the bait.


The craw trailer pictured is a NetBait Paca Chunk, one of my favorites.  You can also use a Rage Tail Lobster which Denny Brauer uses almost exclusively on his jigs.

So that pretty much wraps up all of the knowledge that I have on the brain so far.  I am sure there will be alot more tidbits and tricks to come next go around.  Again, if you guys have any questions don't hesitate to ask and I will answer them to the best of my ability...you can email me at...

Alan @ DuPageAngler.com

Tight Lines Everyone!

Fluke

Monday, February 6, 2012

Breaking Down the Fishing Line Barrier!


My first time walking into Bass Pro Shops when I was about 12 years old left me in a greater state of confusion about the fishing world than any other point in my life. When I looked at all of the shelves of fishing line available at the time I didn't have the faintest clue what to buy!


Word of mouth from a trusted source is usually the best starting point for most anglers when choosing gear, but in a tournament setting you must be able to use that advice and tweak it with your own preferences based upon the gear and lures you are fishing with.

Before we start, here are a few "fishing line rules of thumb" that I always follow whether I am fishing casually or in a tournament...

- Spinning reels should not be spooled with line that has a greater diameter than 10-12 lb monofilament (0.011" to 0.015" on average). **This value can be found in the lower left hand or right hand side of the line package where the lb test rating is located**

- Baitcasting reels should not be spooled with line that has a smaller diameter than 10-12 lb monofilament (0.011" to 0.015" on average)

So now that I know what minimum line diameter I need for each setup, where do I go from here???

Fishing line is broken down into four different types... 1) Monofilament 2) Fluorocarbon 3) Co-Polymer and 4) Braid/Superlines

Each of these lines have their own characteristics, but for my sake there are a select few that I am most concerned about...**each line type is ranked from low to high (left to right)**

- Density (Denser line sinks, Less dense line floats)
Braid/Superline < Monofilament < Co-Polymer < Fluorocarbon

- Durability (How easily is the line damaged due to cover or fish?)
Monofilament < Co-Polymer < Fluorocarbon < Braid/Superline

- Stretch (How much does the line stretch during a hookset or while retrieving a lure?)
Braid/Superline < Fluorocarbon < Monofilament < Co-Polymer

- Visibility (How easily can it be seen in water?)
Fluorocarbon < Monofilament < Co-Polymer < Braid/Superline

- Memory: If you hold the line tight between your two hands and let it go, does it coil up (high) or go limp (low)? (Higher memory causes more difficulty in casting and birds nests)
Braid/Superline < Fluorocarbon < Co-Polymer < Monofilament

So let's use a few examples from my gear list to decide which line I will be using...

1) Topwater Setup
    Reel: Lew's Tournament Pro Speed Spool (7.1 Gear ratio)
    Rod: Shimano Cumara Reaction Series 7' MH Moderate Fast Action

    In any topwater situation I will be using lures with treble hooks. Treble hook lures should preferably be used with a moderate to moderate fast action rod to create a delayed "buffer" between you and the fish during a hookset. Since my rod has this characteristic already I will be less likely to choose a line that will have more stretch that would provide me the same "buffer" effect. Topwater lures also need to float above the surface of the water to remain effective, so a less dense line will enable the bait to remain above the surface. Visibility and durability are also important characteristics to note...but can change radically depending on the water clarity and structure I am fishing. In my case I always fish with Murphy's Law in my back pocket...so I tend to standardize my line with low visibility and high durability in mind.
    So my choice for line will either be a braided line or a co-polymer. Both lines float easily, have higher durability, and have lower memory than monofilament. 12 lb test Co-polymer would most likely be used with smaller topwater lures, and 40 lb braided line most likely with larger topwater lures.

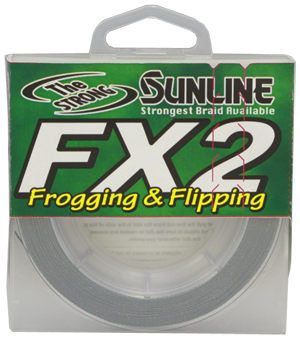
Sunline FX2 Braid and P-Line CXX Co-Polymer

2) Frog Setup
    Reel: Lew's Tournament Pro Speed Spool (7.1 Gear ratio)
    Rod: St. Croix Mojo Bass Rod 7' MH Fast Action

   Again I want a line that floats since frogs are a surface lure. I want to have a very durable line since I will be fishing in heavier cover. A higher lb test will also allow me to horse fish out of cover quicker. Less stretch is also important since it allows me to give an immediate hookset on fast short strikes. Visibility will not be too big of an issue since I will be fishing in heavier cover, and a low memory will help with easier casting.
   For this case my choice will be braided line.  I would also use a heavier braid in the 40-50 lb test range due to the fact that I will be fishing in heavy cover.  The same goes for flipping and pitching. In most cases where I use braid line I will not go below the 30 lb test range for baitcasting gear.

4) Shallow Cranks
    Reel: Lew's Tournament Pro Speed Spool (6.4 Gear Ratio)
    Rod: Shimano Crucial 6' 10" MH Xtra Fast Action

   Again I am using a treble hook lure so I should be using a rod with a medium or medium fast action tip...but wait, no i'm not!  I actually have an Extra Fast tip!  The reason why is because of the extra sensitivity that I can feel using an extra fast tip instead of a medium or medium fast tip for running squarebill cranks.  Don't be alarmed though, it is still OK to use my original guidelines for choosing a rod for treble hook lures! As you branch out and adapt to your equipment, you will begin to add your own flavor and notice the sensitivity gains when using other types of rod tips!  
     Now that I just completely threw you a curveball on this setup, what should I do now?  I will now have to rely on my line to become that extra "buffer" that I need since the rod tip does not do that well enough.  So I will need a line with more stretch, high durability, and lower density.  So from those characteristics my best bet would have to be 12 lb co-polymer once again.  Yes co-polymer is denser than monofilament, but I can combat this by choosing the smaller 12 lb test diameter.

6) Medium/Deep Cranks
    Reel: Abu Garcia Revo Winch (5.4 Gear Ratio)
    Rod: Shimano Compre Crankbait rod 7' 6" MH Mod-Fast

     Since this again is a crankbait rod, the moderate fast tip will do most of the work for "buffering" a hookset on a fish so a less stretch line will be more applicable.  And since these are sub surface lures a denser line would be preferable to get the lure to sink quicker in the water column.  Throw in some durability and low visibility and what do you get??? Fluorocarbon!!!  Flourocarbon is by far the best line for med/deep crankbaits among many other lures such as spinnerbaits, lipless crankbaits, C-rigs, and swim baits that also require a quicker sinking effect.  For most crankbait setups I would probably go with a 15 lb test Fluorocarbon.

Seaguar InvizX and Red Label Fluorocarbon

So with these examples I hope you start to gain a better understanding of what line should be chosen for each application.  Not all of this will be clear at first and not every trick of the trade was discussed, but after some practice and experience with different lines you will start to piece this together little by little.  But the most important thing to take away from all of this is to use what you are most comfortable with!  It took me several years to start fine tuning my choices and I am still not completely done, but I now have laid the groundwork to make those choices easier for myself in the long run!

Tight Lines...and if you have any questions just email me at alan@dupageangler.com

Fluke